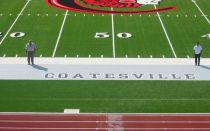
Hash Mark Stencil
$199.99


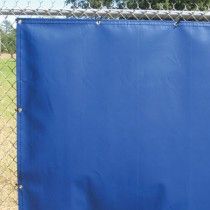
ARMOR MESH WINDSCREEN
Windscreen is ideal for anywhere you need a visual barrier. (TK)
PREMIUM ARMOR MESH WINDSCREEN
VINYL COATED - CUSTOM SIZES - CUSTOM COLORS
Our Low Down Pricing:
PANELS UP TO 6FT HIGH
$0.95 Per Square Ft.
PANELS UP TO 9FT HIGH
$01.10 Per Square Ft.

All windscreen panels over 6 ft high have a lacing lip to prevent billowing and breaking away, ensuring longer life.
Important Note: Windscreen is manufactured in 6ft and 9ft rolls. Orders under 6ft high are billed as 6ft high and orders from 6ft 1 inch to 9ft are billed as 9 ft. For Example: If you need a panel that is 5ft H x 10 ft L it will be billed as 60 sq ft (6ft H x 10ft L) Likewise a panel that is 8ft H x 10ft L will be billed as 90 sq ft (9ft H x 10ft L)
Please allow 2 to 4 weeks for delivery. Custom Printed Windscreen may take 5-7 weeks during peak seasons.
WE ACCEPT SCHOOL PURCHASE ORDERS
Questions, Need an Official Quote? Click Here for More Info
SPECIFY THE FOLLOWING:
SIZE, COLOR, CUSTOM LETTERING OR LOGOS, IF ANY.
OR CALL TOLL FREE 1-877-559-5425 TO SPEAK WITH AN EXPERT
SCROLL DOWN FOR MEASURING TIPS AND INSTALLATION PROCEDURE
BENEFITS AND SPECIFICATIONS:
Windscreen is ideal for anywhere you need a visual barrier. When hung on the fence it provides a solid background; reducing visual distractions, increasing visibility and eliminating unwanted spectators.
Our windscreen is custom made to your specifications.
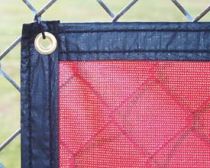
- Armor Mesh with Incrediseal hems is the most durable windscreen made
- Can be screen printed with your school logo or advertisements
- Offers 75% shade and 6x more abrasion resistance than other VCM screens
- Weighs 14 oz per sq/yd
- Maximum UV sunlight protection and mildew resistance
- Brass tooth grommets spaced every 18" around the perimeter
- Available in 13 colors
- 5-year limited warranty when properly installed.
- For ease of installation the maximum recommended length is 50'
- Windy Area? We offer 6x12 hemmed boxed vents ($11.50 ea) or half moon flap vents ($3.95 ea).
INCREDISEAL HEMS

INCREDISEAL FEATURES:
- Sewing & stitching eliminated = zero possibility of thread breaks, open seams or hems.
- Clean look - no pleats, no black webbing on hem, no stitches
- Web reinforcement is inside the 3 ply heat bonded hem
LETTERING AND LOGOS:
Wizard Sports is able to customize your windscreen with lettering and logos. For lettering pricing, please use the chart below. All custom logos are made to order. Please call or click the link below for a quote. Standard Lettering and Logo Colors: Black, Gray, Kelly Green, Maple Green, Maroon, Navy, Orange, Purple, Red, Royal Blue, Sky Blue, Tan, White and Yellow.
LETTER HEIGHT 1 COLOR PRICE BEST READABILITY MAX READABILITY
42 INCH $64 EACH 420 FT 1750 FT
48 INCH $69 EACH 480 FT 2000 FT
54 INCH $79 EACH 540 FT 2250 FT
60 INCH $89 EACH 600 FT 2500 FT
72 INCH $109 EACH 720 FT 3000 FT
CUSTOM LOGOS:
UP TO 15 SQ FT (EX. 3FT X 5 FT) $275
UP TO 30 SQ FT (EX. 5FT X6 FT) $349
UP TO 50 SQ FT (EX. 5FT X 10FT) $489
UP TO 100 SQ FT (EX. 10FT X 10FT) $899
PRINTING SPECIFICATIONS:
* Letters are Varsity Block Style. Other standard font styles are available upon request. Thicker font letters or additional spacing between letters require an upcharge.
* Custom colors to match school colors or PMS shades must be quoted individually and may require an upcharge.
* Minimum Charge: $300
* Pricing Example: BEARS at 42 inch height is $320 (5 letters @ $64 each).
WE ACCEPT SCHOOL PURCHASE ORDERS
Questions, Need an Official Quote? Click Here for More Info
SPECIFY THE FOLLOWING:
SIZE, COLOR, CUSTOM LETTERING OR LOGOS, IF ANY.
OR CALL TOLL FREE 1-877-559-5425 TO SPEAK WITH AN EXPERT
TIPS ON MEASURING FOR YOUR WINDSCREEN:
1. Plan it Out
Start by drawing a basic diagram of your fencing. Writing down measurements next to each section will help keep things organized and prevent confusion down the line.
Labeling or numbering sections is always a good idea (Right Field, Right Field Gate, etc...). Consider including a directional indicator or noting landmarks to make review and final installation as easy as possible. Photos are a valuable tool to ensure accurate final results.

2. Measuring Length
Starting at a corner post, measure the length of your fence from the inside of the left tension bar (see figure) to the inside of the next tension bar. Pull the measuring tape taut against the fence to ensure accurate measurements. Avoid taking measurements from the side where support poles are installed. Be sure to account for any breaks or obstructions in your fencing (such as gates) in your measurements, which will require a new section.
For a smooth and professional look, subtract 1-2” from your final measurement. It is easier to adjust for a windscreen to being slightly too short than too long, which can result in a loose, baggy installation.
Note any specific measurements for custom graphics when exact placement is necessary (example: “foul marker 18’6” from left”).
For longer runs, we will help determine the best breakdown of screen lengths to achieve your final length.
3. Measuring Height
When measuring heights, account for at least 4-6” of space at the bottom to prevent damage from field maintenance. Your fence may have different heights - be sure to measure each section carefully.
4. Measuring Gates
Gates are measured using the same technique as the rest of your fence with one caveat: Since gates can be opened/closed (and have ground clearance), it’s not necessary to leave a gap at the bottom. Many customers still opt to match the heights of the surrounding windscreen for a uniform appearance.
5. Angle Cuts & Cut Outs
If your installation requires special angle cuts or cutouts, the best starting point is a detailed drawing or photo with notes. Take as many measurements as possible and consider including - the more complete the information, the better the end result will fit. Our design department will proof any custom screens to make sure you end up with what you need.
6. Putting It All Together
Using the techniques listed above, work your way clockwise around your fence, marking down each (adjusted) measurement on your sketch as you go. Measure every section – do not assume any two sections are the same size!
SUGGESTED PROCEDURE FOR INSTALLATION AND TIPS:
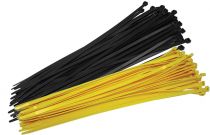
Start at one end of the fence area to be covered. Lay out full panel along area to be covered. Attach top corner grommet to the fence with tie wrap (or cord). Then, attach along top, pulling cover taut with each grommet attachment for about 10’.
Tip 1: Use a few “S” hooks to temporarily hang the panel on the fence. By “lifting” the panel, it lessens the weight and makes it easier to attach and tighten the tie wrap at the grommet.
Important! Attach at every grommet. Do not skip grommets. Attachment at all grommets distributes the force when there is a high wind load. Using fewer grommets for attachment results in more load on attached grommets and greater chance of ties breaking. When windscreen cover breaks loose and whips against the fence, it can be damaged beyond repair in a few hours.
Tip 2: Attach tie wrap to the fence in the direction the panel is being pulled (rather than slightly backward). As the tie is tightened, it will pull the cover taut. Make sure tie is secure, but don’t over tighten tie wraps (Tightening the tie wraps too much might result in wrinkling of cover and insufficient room to straighten out panel). After panel is completely attached, ties can be tightened more, if necessary, to minimize any remaining wrinkles. Go back to end and from top-to-bottom attach vertical edge to the fence all the way to the bottom, again pulling taut as each tie is secured. Continue attachment along bottom for about 10’ pulling cover taut and making it as wrinkle free as possible.
Tip 3: If two or more people are working on the panel, have one person begin attachment at the top and the second person at the bottom, working about 10’ behind the first. After the first 10’ of windscreen is attached at top and bottom, go back to the top and attach along the next 10’, pulling taut. Continue top/bottom attachment until panel is completely in place. Continue installation with remaining panels using the same procedure.
Tip 4: Don’t install on a windy day. Wind will complicate installation.
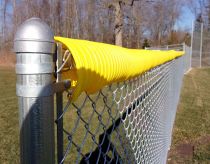
IMPROPER INSTALLATION PROPER INSTALLATION


TIPS ON MAINTAINING YOUR WINDSCREEN:
• Check the Windscreen after any high winds or storms for any loose attachments and re-tension those attachments to avoid damage by “wind-whip”.
• If severe weather is imminent, remove the windscreen entirely or release the bottom and sides, roll up the panel, and fasten it along the top.
• Visually check the Windscreen for wear and tear and patch holes with Tear-Aid to keep them from enlarging over time.
• Clean the material with a mixture of warm water and mild dish soap and hose off windscreen periodically.
• Do not pressure wash or use any cleaning products that contain chlorine or bleach. This may cause discoloration or deterioration.
• If storing for the winter, hose off and dry completely before storage
Write Your Own Review
Related Products
Check items to add to the cart or